Have you ever wondered how to make a cat tail that looks just right? Whether you’re creating a costume, a fun accessory, or a playful prop, getting the tail perfect can be tricky.
You want it to be soft, flexible, and realistic, but also easy to make with materials you have at home. In this guide, you’ll discover simple steps and insider tips that make crafting your own cat tail not only possible but enjoyable.
Keep reading, and by the end, you’ll have a tail that’s ready to impress!
Materials Needed
Starting a cat tail project needs the right materials. Choosing the best supplies helps you create a tail that looks great and feels soft. Gather everything before you begin for a smooth crafting experience.
Fabric Choices
Pick soft fabrics like faux fur or fleece for a fluffy tail. These materials feel nice and mimic a real cat’s tail. You can choose colors like gray, black, white, or striped patterns. Cotton fabric also works well if you want a lighter tail. Avoid stiff or rough fabrics that may feel uncomfortable.
Tools Required
Keep scissors sharp and ready for cutting fabric cleanly. A sewing needle and thread match your fabric color. A hot glue gun can help attach parts quickly. Pins hold fabric pieces together while sewing. A measuring tape ensures your tail is the right size.
Additional Supplies
Stuffing fills the tail to give it shape. Polyester fiberfill is soft and easy to use. Wire helps make the tail bendable and poseable. Use a wire that is thin but strong. You might also want a safety pin or clip to attach the tail to clothing.
Preparing The Pattern
Preparing the pattern is the first step in making a cat tail. It helps to shape the tail correctly. A good pattern saves time and materials. It guides your cuts and sewing.
Take your time with this step. The pattern affects the final look of the tail. A clear pattern also makes assembly easier. Start by deciding the tail’s size and shape. Then create a simple template to follow.
Choosing Tail Length And Shape
Decide how long the tail should be. Measure from where the tail will attach to the end point. Typical lengths range from 12 to 24 inches.
Pick a shape that fits your style. Cat tails can be thin, fluffy, or curved. A straight tail is easy to sew. A curved tail looks more natural but is harder to make.
Consider the tail’s width too. A thicker tail needs more fabric and stuffing. A thin tail uses less fabric but may look less full.
Creating A Template
Use paper or cardboard to create your template. Draw the tail shape on the paper first. Cut it out carefully with scissors. This gives a guide for your fabric pieces.
Double-check the size by holding the template next to your body. Adjust if the size feels too long or short. Make sure the shape matches your plan.
Mark any seam allowances on the template. This extra space helps with sewing the pieces together. Usually, ¼ inch seam allowance works well.
Cutting The Fabric
Cutting the fabric is a key step in making a cat tail. It shapes the tail and affects how it looks and feels. Careful cutting helps the tail look neat and last longer. Prepare your workspace and tools before starting. Clear space and sharp scissors make cutting easier and safer.
Transferring The Pattern
First, place your pattern on the fabric. Use pins or weights to keep it still. Trace the pattern edges with a fabric marker or chalk. Mark any important points or notches on the fabric. These marks help align pieces during sewing. Double-check the pattern size matches your plan. Cut around the traced lines carefully. Avoid lifting the pattern until cutting finishes. This keeps lines accurate and clean.
Cutting Tips
Use sharp fabric scissors for clean cuts. Dull scissors can cause jagged edges and fraying. Cut slowly and follow the lines exactly. Do not rush. Keep the fabric flat on the table to avoid wrinkles. Cut one layer at a time unless fabric is thin. Avoid stretching the fabric while cutting. Smooth, steady motions give the best results. Check your work after cutting to ensure pieces match the pattern.

Credit: www.youtube.com
Sewing The Tail
Sewing the cat tail is a key step in your craft project. It shapes the tail and holds the fabric together. Good sewing makes the tail look neat and last long. Patience and care help create a smooth, stuffed tail that feels soft.
Use simple stitches and take your time. Small, even stitches work best for a clean look. Avoid pulling the thread too tight to keep the fabric from puckering.
Stitching Techniques
Choose a stitch that is strong and easy to hide. The running stitch is simple and effective for beginners. It goes in and out of the fabric in small, equal steps.
The backstitch is stronger and good for areas that need more hold. It looks like a continuous line and prevents gaps. Use matching thread color to blend with the fabric.
Keep your stitches close together. This stops the stuffing from coming out later. Make sure to sew both sides evenly for a balanced shape.
Leaving An Opening
Leave a small opening at the end or side of the tail. This space is for turning the tail right side out. It also allows you to add the stuffing inside.
Do not sew the opening closed yet. Stuff the tail gently to keep it soft and full. After stuffing, use a ladder stitch to close the opening neatly.
Keep the opening small but big enough to fit your fingers inside. This makes stuffing easier and prevents damage to the fabric.
Stuffing The Tail
Stuffing the tail is a key step in making a cat tail that looks good and feels right. The stuffing shapes the tail and helps it keep its form. It also makes the tail soft or firm, depending on what you want.
Choosing the right stuffing and filling the tail properly gives your creation a professional touch. The right firmness makes the tail more realistic and comfortable to wear.
Best Stuffing Materials
Polyester fiberfill is the most popular choice. It is soft, lightweight, and easy to use. Cotton stuffing works well too, but it can be heavier. Foam strips add structure and keep the tail firm. Old fabric scraps or pillow stuffing can be reused for eco-friendly options.
Achieving Desired Firmness
Start by adding small amounts of stuffing. Push the stuffing evenly inside the tail. Too much stuffing makes the tail stiff and hard to move. Too little stuffing makes it floppy. Adjust the amount until the tail feels just right. Test the tail’s bend and shape often. This helps get the firmness you want.

Credit: www.gathered.how
Attaching The Tail
Attaching the tail is a key step in making a cat tail look realistic and stay in place. The tail must be secure but also comfortable to wear. It should move naturally without falling off. Choosing the right attachment method depends on your needs and materials. Some ways work better for costumes, others for daily wear. The goal is to keep the tail steady and easy to remove.
Methods For Secure Attachment
One common way to attach a cat tail is by sewing it directly onto clothing or a belt. This method offers strong support and keeps the tail from shifting. You can use a needle and thread to stitch the base of the tail firmly. Another option is to use safety pins or velcro strips. These allow quick removal and adjustment. Glue can be used but may not hold well on fabric for long periods.
Using Straps Or Clips
Straps and clips provide flexible ways to attach the tail without sewing. Elastic straps can wrap around the waist and hold the tail in place comfortably. Adjustable straps work well for different body sizes. Clips, like alligator clips or hair clips, can fasten the tail to a belt or waistband. This method is quick and lets you remove the tail easily. Using clips also prevents damage to your clothes.
Adding Final Touches
Adding final touches to your cat tail brings your creation to life. This step makes the tail look neat and complete. It also allows you to add personal style and character. Take your time to perfect every detail for the best result.
Trimming And Shaping
Trim any excess fabric or fur to create a clean edge. Shape the tail to match the look you want. Round the tip for a soft, natural finish or point it for a playful style. Use sharp scissors for precise cuts. Check your work often to keep the shape balanced and smooth.
Optional Decorations
Decorations add personality to your cat tail. Consider sewing on small bows, bells, or ribbons. Use fabric paint for stripes or spots. Glue on soft faux fur patches for extra texture. Keep decorations light so the tail remains easy to wear. Choose colors that match your overall costume or style.
Troubleshooting Common Issues
Creating a cat tail can be fun, but some common problems may arise. These issues can affect the look and movement of your cat tail. Troubleshooting helps fix these problems quickly. It makes your tail look neat and work well.
Fixing Loose Seams
Loose seams make the tail look messy and weak. Use a needle and thread to sew the loose parts. Stitch tightly but gently to avoid holes. Check all seams for any weak spots. Reinforce these areas with extra stitches. This keeps the tail strong and durable.
Adjusting Tail Movement
Sometimes the tail does not move smoothly. Check the inside for stiff wires or parts. Bend wires gently to improve flexibility. Avoid sharp bends that can break the wire. Use soft stuffing to help shape the tail. Make sure stuffing is even, not lumpy. This helps the tail move more naturally.
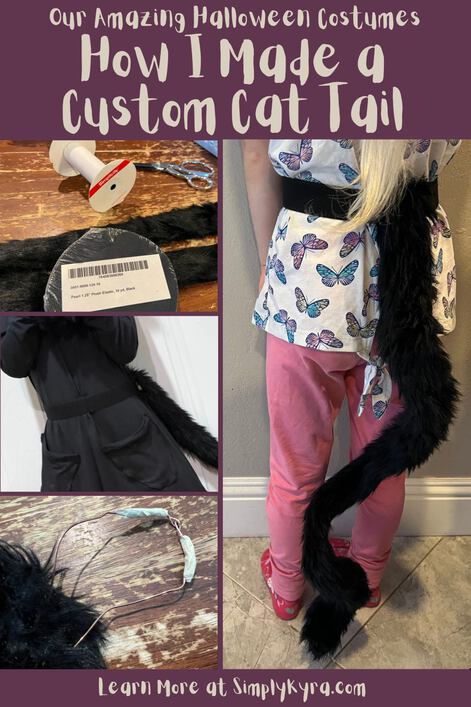
Credit: www.simplykyra.com
Frequently Asked Questions
What Materials Do I Need To Make A Cat Tail?
You need fabric, stuffing, thread, scissors, and a needle or sewing machine.
How Long Should A Homemade Cat Tail Be?
A good length is about 18 to 24 inches for easy wear and movement.
Can I Make A Cat Tail Without Sewing Skills?
Yes, use fabric glue or safety pins to attach pieces if you don’t sew.
What Fabric Works Best For A Cat Tail?
Soft fabrics like faux fur, felt, or fleece create a realistic and comfortable tail.
How Do I Attach The Cat Tail To My Clothes?
Use a safety pin, belt loop, or sew a strap to fix it securely.
How Do I Keep The Cat Tail Fluffy And Full?
Stuff the tail with cotton or polyester filling evenly to keep its shape well.
Conclusion
Making a cat tail is simple and fun to try. You only need a few materials and some patience. Follow each step carefully to get a soft, fluffy tail. It can be a great addition to costumes or playtime. Enjoy the process and add your own style.
Practice will help you get better every time. Keep creating and have fun with your handmade cat tail!
As an Amazon Associate, I earn from qualifying purchases.