Have you ever wanted to add a fun and cute touch to your hats or headbands? Learning how to crochet cat ears is easier than you think, and it’s a great way to show off your personality.
Whether you’re making a gift or treating yourself, these little ears bring charm and style to any outfit. In this guide, you’ll discover simple steps that anyone can follow, even if you’re new to crocheting. Keep reading, and soon you’ll be creating adorable cat ears that everyone will love!
Materials Needed
Crocheting cat ears is a fun and simple project. The right materials make your work easier and more enjoyable. Before starting, gather all the items you need. This will help you stay focused and complete your craft without interruptions.
Choosing the correct yarn, hook size, and tools is very important. These affect the shape and size of your cat ears. Below are the key materials to prepare before you begin.
Yarn Choices
Select yarn that feels soft and is easy to handle. Acrylic or cotton yarn works well for beginners. Choose colors that match your style or favorite cat. Avoid very thin yarn, as it can be hard to crochet. Medium weight yarn is best for clear, sturdy ears.
Hook Sizes
Pick a crochet hook that fits your yarn weight. Usually, a 4mm or 5mm hook is perfect for medium yarn. Using the right hook size helps keep your stitches even. Too big or too small hooks can change the ear shape.
Additional Tools
Prepare scissors for cutting yarn cleanly. A yarn needle is useful for sewing the ears together. Stitch markers can keep track of your rounds or rows. Have a tape measure handy to check your ear size.

Credit: www.youtube.com
Basic Crochet Stitches
Learning basic crochet stitches is the first step to making cute cat ears. These stitches build the shape and structure of your project. They are easy to learn and practice. Understanding these stitches helps you follow patterns and create neat designs.
Each stitch has a unique look and function. Using the right stitch ensures your cat ears look firm and stylish. Start with these three simple stitches to get comfortable with the craft.
Chain Stitch
The chain stitch is the foundation of most crochet projects. It creates a row of loops that form the base. To make a chain stitch, wrap the yarn around the hook and pull it through the loop. Repeat this to make a chain of the needed length. It’s simple but very important.
Single Crochet
Single crochet is a tight stitch that makes a strong fabric. Insert the hook into the stitch, yarn over, and pull through. Then yarn over again and pull through both loops on the hook. This stitch adds thickness and firmness to your cat ears. It is perfect for shaping small parts.
Slip Stitch
Slip stitch is used to join parts or move the yarn without adding height. Insert the hook into the stitch, yarn over, and pull through both the stitch and the loop on the hook. It creates a smooth, flat finish. Use slip stitches to close the edges of your cat ears neatly.
Starting The Cat Ears
Starting the cat ears is an exciting step in your crochet project. This phase sets the shape and size of the ears. It is important to follow each step carefully to get neat and even ears. Keep your yarn and hook ready. Let’s begin with the foundation chain.
Creating The Foundation Chain
The foundation chain is the base of your cat ears. Start by making a slip knot on your hook. Then, yarn over and pull through to make a chain stitch. Repeat this to make the number of chains needed. Usually, 6 to 8 chains work well for cat ears. Count your stitches to avoid mistakes. The chain should not be too tight or loose. This helps the ears hold their shape.
Building The Base Row
After the foundation chain, build the base row with single crochet stitches. Insert the hook into the second chain from the hook. Yarn over and pull through. You now have two loops on the hook. Yarn over again and pull through both loops. This completes one single crochet stitch.
Continue this across the chain. Single crochet each stitch until you reach the end. This row forms a sturdy base for your ears. Keep your tension even for a smooth edge. Once done, chain one and turn your work to start the next row. Your cat ears are shaping up well.
Credit: www.craftykittycrochet.com
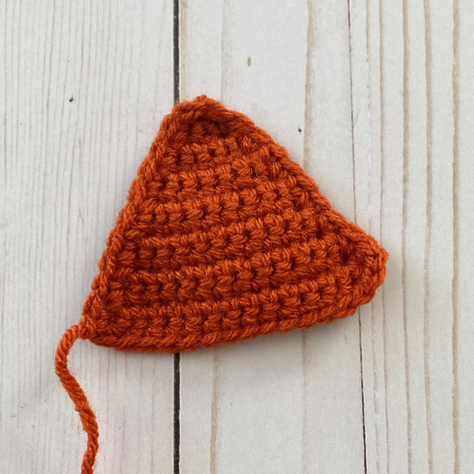
Shaping The Ears
Shaping the cat ears is an important step in your crochet project. This part gives the ears their classic triangular look. You will use simple techniques to make the ears stand out. This guide explains how to increase and decrease stitches and form the perfect triangle shape.
Increasing Stitches
Start by adding stitches to widen the base of the ear. This makes the ear look fuller and more natural. Increase stitches evenly across the row. This helps the ear grow at the right pace. Use simple increases like single crochet two in one stitch.
Decreasing Stitches
Next, reduce stitches to shape the top of the ear. Decreasing narrows the ear toward the tip. Use basic decreases such as single crochet two together. This pulls the stitches together smoothly. Keep decreasing until the ear forms a point.
Forming The Triangle
The triangle shape comes from the balance of increasing and decreasing stitches. Start with a wide base and narrow as you go up. This creates the classic cat ear silhouette. Check your work often to keep the shape even and neat. Tight stitches help the ears hold their form well.
Finishing Touches
Finishing touches make your crochet cat ears look neat and complete. These small steps improve the overall look and durability. A clean finish helps the ears hold their shape and look professional. Let’s explore two important finishing steps to perfect your project.
Weaving In Ends
Weaving in ends hides the yarn tails inside your work. Use a yarn needle to thread the loose ends through stitches. Pull gently to secure the yarn without stretching the fabric. Weave the ends back and forth for about two inches. This prevents the yarn from unraveling later. Trim any extra yarn close to the fabric. Tidy ends give your cat ears a polished look.
Adding Embellishments
Embellishments add personality and charm to your cat ears. Sew small buttons or beads at the base or tips for decoration. Attach felt pieces inside the ears for color contrast. Use embroidery thread to stitch simple designs or patterns. Make sure all decorations are securely fastened. Personal touches make your crochet cat ears unique and fun to wear.

Credit: www.reddit.com
Attaching Ears To Accessories
Attaching your crocheted cat ears to accessories makes them wearable and fun. You can add them to headbands, hats, or clips. Each method has a simple way to keep ears secure and neat. Choose the best option for your style and comfort.
Sewing Onto Headbands
Sewing ears onto headbands creates a stable and comfortable fit. Use a needle and thread that matches the ear color. Stitch along the base of the ears tightly to the headband. Check that the ears stand up straight and do not wobble. This method works well for long wear and active use.
Pinning To Hats
Pinning ears to hats allows easy removal or repositioning. Use small safety pins or brooch pins behind the ear base. Attach pins carefully to avoid holes or damage to your hat. Pins make it simple to change ear styles or share accessories. Perfect for hats made of soft or thick fabric.
Using Clips
Clips offer a quick way to attach ears to hair or clothing. Hot glue small alligator clips or snap clips to the ear base. Let the glue dry fully before use. Clips work well for temporary wear or kids’ accessories. They also add versatility to your crocheted cat ears.
Tips For Customization
Customizing your crochet cat ears makes your project unique and fun. Simple changes can give your ears a fresh, personal look. Small tweaks help your creation stand out and match your style perfectly.
Color Combinations
Choose colors that match your mood or outfit. Soft pastels create a cute look. Bright colors make your ears bold and eye-catching. Try mixing two or three shades for a fun twist. Use different yarn types for subtle color changes.
Size Adjustments
Make the ears bigger or smaller by changing stitch numbers. Larger ears look playful and dramatic. Smaller ears fit well on hats or headbands. Measure your head to get the perfect fit. Adjust the height by adding or reducing rows.
Adding Texture
Texture adds depth to your cat ears. Use different stitch patterns like bobbles or puff stitches. Combine smooth and bumpy stitches for a unique feel. Add a soft yarn inside for a fluffy effect. Texture makes your ears more interesting to touch and see.
Frequently Asked Questions
What Materials Do I Need To Crochet Cat Ears?
You need yarn, a crochet hook, scissors, and a yarn needle to crochet cat ears.
How Long Does It Take To Crochet Cat Ears?
Crocheting cat ears usually takes about 30 to 60 minutes, depending on skill.
What Crochet Stitches Are Best For Cat Ears?
Single crochet and slip stitches are best for making firm and neat cat ears.
Can Beginners Learn To Crochet Cat Ears Easily?
Yes, cat ears use simple stitches, making them perfect for beginners to try.
How Do I Attach Crocheted Cat Ears To A Headband?
Sew the cat ears securely onto the headband using a yarn needle and matching yarn.
What Yarn Types Work Best For Crocheting Cat Ears?
Use medium-weight, soft yarn like acrylic or cotton for comfortable and sturdy cat ears.
Conclusion
Crocheting cat ears is a fun and simple craft project. You only need basic stitches and a little patience. Practice each step slowly, and you will see great results. These ears can add charm to hats, headbands, or costumes. Enjoy making something cute with your own hands.
Keep trying, and your skills will grow every time. Happy crocheting!
As an Amazon Associate, I earn from qualifying purchases.