Are you tired of slow internet or messy cables cluttering your space? Learning how to make a Cat 5E cable yourself can save you money and give you control over your network setup.
Imagine having a custom-length cable that fits perfectly, without any extra twists or tangles. In this guide, you’ll discover simple steps to create your own reliable Cat 5E cable, even if you’ve never done it before. Keep reading, and by the end, you’ll have the skills to connect your devices like a pro.

Credit: www.youtube.com
Tools And Materials Needed
Making a Cat 5E cable needs a few basic tools and materials. These items help you create a strong and reliable cable for your network. Having the right tools makes the job easier and faster. Let’s explore what you need.
Cat 5e Cable Types
Cat 5E cables come in two main types: solid and stranded. Solid cables have a single wire inside each conductor. They work well for long, fixed runs inside walls or ceilings. Stranded cables have many small wires twisted together. They are more flexible and best for short, movable connections.
Crimping Tool Essentials
A crimping tool is needed to attach connectors to the cable ends. It presses the pins inside the connector onto the wires securely. Choose a tool made for Cat 5E cables and RJ45 connectors. Good crimpers cut, strip, and crimp all in one tool.
Rj45 Connectors
RJ45 connectors link the cable to devices like routers and computers. They have eight pins that match the eight wires inside the cable. Use connectors made for Cat 5E cables. These ensure a strong signal and good connection.
Wire Stripper And Cutter
A wire stripper removes the outer jacket of the cable without damaging the wires inside. The cutter trims the cable to the right length. Both tools should be sharp and easy to use. Proper stripping and cutting help avoid connection problems.
Credit: www.groundcontrol.com
Preparing The Cable
Preparing the cable is the first step in making a Cat 5E cable. It ensures the cable is ready for proper wiring. Proper preparation helps avoid errors and connection problems later. Follow these steps carefully to get a clean and neat cable end.
Measuring And Cutting To Length
Measure the cable length you need for your setup. Add a little extra length to avoid tight connections. Use sharp scissors or cable cutters for a clean cut. Cut the cable straight across to keep the wires inside aligned.
Removing The Outer Jacket
Use a cable stripper or a small knife to remove the outer jacket. Cut around the cable without slicing the inner wires. Pull off the jacket gently to expose the twisted wire pairs inside. Be careful not to damage the wires during this step.
Untwisting The Wire Pairs
Untwist each pair of wires carefully to separate them. Straighten the wires to prepare for arranging in the connector. Keep the untwisted length short to maintain cable performance. Organize the wires according to the wiring standard you follow.
Arranging The Wires
Arranging the wires correctly is the key to making a Cat 5E cable that works well. The wires inside the cable follow specific color codes. These colors help you know where each wire should go in the connector. Proper arrangement ensures good signal and avoids connection problems. You must keep the wires straight and in the right order before cutting and inserting them into the connector.
Color Coding Standards
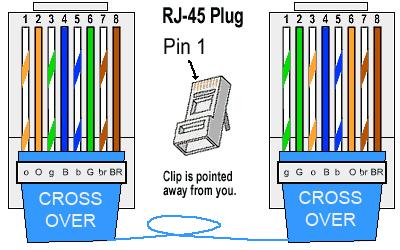
Cat 5E cables use two main color coding standards: T568A and T568B. Each standard has a different order for the colored wires. The colors include green, orange, blue, and brown pairs. The T568A standard starts with green, then orange, blue, and brown. The T568B standard starts with orange, then green, blue, and brown. Choose one standard and use it on both ends of the cable. This keeps the cable consistent and working properly.
Straight-through Vs Crossover Wiring
Straight-through cables have the same wire order on both ends. These cables connect computers to switches or routers. Crossover cables switch the orange and green pairs on one end. This type connects two computers directly. Knowing the difference helps you make the right cable for your needs. Use straight-through for most home and office networks. Choose crossover only for special cases, like linking two computers.
Trimming And Aligning Wires
Trimming and aligning wires is a key step in making a Cat 5E cable. It ensures good connection and signal quality. Proper trimming prevents loose wires and interference. Aligning wires correctly fits the connector perfectly. This step prepares the cable for the next phase of assembly.
Even Wire Lengths
Cut all wires to the same length before inserting them into the connector. Uneven wires can cause poor contact and signal loss. Use a wire cutter to trim them neatly. Keep the length short enough to fit inside the connector. Aim for about half an inch of exposed wire.
Ensuring Proper Alignment
Arrange the wires in the right order following the wiring standard. Hold them flat and side by side. Check that no wires are twisted or crossed. Straight wires slide easily into the connector slots. Proper alignment helps the pins make good contact with each wire.
Inserting Wires Into Connector
Inserting wires into the connector is a key step in making a Cat 5E cable. Proper wire placement ensures a strong, reliable connection. Take your time to arrange the wires carefully before pushing them into the connector.
Each wire must fit fully into its slot. This avoids connection problems later. The wires should lie flat and straight inside the connector. Avoid bending or twisting them too much.
Proper Insertion Depth
Push the wires all the way into the connector. The copper ends must reach the metal pins inside. This ensures a good electrical contact.
Check that the wires do not stop short. They should not extend beyond the connector’s end either. The right depth helps prevent signal loss.
Checking Wire Order
Follow the correct wire color sequence before inserting. The order must match the chosen wiring standard, like T568A or T568B.
Double-check the order after placing the wires. An incorrect sequence causes network errors and poor performance.
Use a wiring diagram as a guide. It helps keep the wires in the right order and saves time.
Crimping The Connector
Crimping the connector is a key step in making a Cat 5E cable. It joins the cable wires to the RJ45 connector. A proper crimp ensures a strong, reliable connection. Poor crimping can cause signal loss or no connection at all.
This step needs care and the right tools. Follow the instructions carefully to get the best result.
Using The Crimping Tool Correctly
Hold the crimping tool firmly. Insert the RJ45 connector with the wires inside. Push the connector fully into the tool’s slot. Squeeze the handles evenly and with steady force. This presses the metal pins into the wires.
Do not rush or use too much force. Check that the connector fits snugly and wires stay in place. A good crimp feels firm and secure.
Testing The Connection
After crimping, test the cable to ensure it works. Use a cable tester to check each wire. The tester shows if the wires connect correctly and without breaks. A green light or beep means a good connection.
If the test fails, cut off the connector and try again. Testing saves time and frustration later. It confirms your cable is ready to use.
Testing The Finished Cable
Testing the finished Cat 5E cable is a key step. It ensures the cable works well. A properly tested cable prevents network issues and saves time. Testing checks the wiring and signal quality. This step confirms the cable’s reliability before use.
Using A Cable Tester
A cable tester is a simple tool. It checks each wire inside the cable. Connect both ends of the cable to the tester. Turn on the tester and watch the lights. The lights show if the wires are correct. Green lights mean good connections. Red or no lights show a problem. Testing with a cable tester is fast and easy.
Troubleshooting Common Issues
Sometimes tests show errors. Common issues include crossed wires or breaks. Check the cable ends and make sure wires match the color code. Re-crimp the connectors if needed. Also, check for damaged wires or loose connections. Repeat the test after fixing problems. Keep testing until the cable passes all checks.
Tips For Durable And Reliable Cables
Creating Cat 5E cables that last long and work well requires care. Small steps in making and handling cables can prevent issues. These tips help keep cables strong and reliable.
Avoiding Cable Damage
Do not bend the cable sharply. Sharp bends can break wires inside. Avoid pulling the cable too hard during installation. Pulling stresses the wires and connectors. Keep the cable away from heat sources. Heat can melt or weaken the cable jacket. Do not step on or crush the cable. Heavy pressure can damage the wires inside. Check cables regularly for cuts or cracks. Replace damaged cables to avoid connection problems.
Proper Storage And Handling
Store cables in a cool, dry place. Moisture can cause corrosion inside connectors. Coil cables loosely to avoid tight loops. Tight coils cause internal wire damage. Use cable ties or Velcro straps to keep coils neat. Avoid using metal ties that can cut the cable. Label cables to identify them easily. Handle connectors gently to prevent pin damage. Keep cables away from sharp objects that can cut the jacket.

Credit: www.youtube.com
Frequently Asked Questions
What Tools Do I Need To Make A Cat 5e Cable?
You need a cable stripper, crimping tool, RJ45 connectors, and a Cat 5E cable.
How Long Should A Cat 5e Cable Be Cut?
Cut the cable to the length you need, usually up to 100 meters.
What Is The Correct Wire Order For Cat 5e Cables?
Use the T568B wiring standard: white-orange, orange, white-green, blue, white-blue, green, white-brown, brown.
How Do I Strip The Cat 5e Cable Properly?
Remove about 1 inch of the outer jacket without damaging the inner wires.
How To Ensure A Secure Connection On Cat 5e Cables?
Make sure wires are straight, fully inserted into the connector, and crimped tightly.
Can I Test My Cat 5e Cable After Making It?
Yes, use a cable tester to check all wires are connected correctly.
Conclusion
Making a Cat 5E cable is easier than it seems. You only need a few tools and some patience. Follow the steps carefully to get good results. A well-made cable ensures better internet and network speed. Practice helps you improve your skills over time.
Try making cables for your home or office projects. Small efforts can save money and time. Keep your workspace clean and organized for better focus. Enjoy the satisfaction of building your own network cable.
As an Amazon Associate, I earn from qualifying purchases.